Data layer implementation and examples to get you started
May 26, 2022

Is your business website optimized for data collection? If it doesn’t have a data layer, then it’s far from optimized. It takes a bit of work but is well worth the effort. Learn how to create a data layer from scratch and see some examples of the implementation in action.
What is a data layer?
A website is composed of layers that interact and relay information from one layer to another. More complex websites may have dozens of layers. At the most basic, websites have these three fundamental layers:
- Presentation layer:This is the outermost layer and is the part of the website that visitors see and interact with.
- Data layer:The data layer collects information from the presentation layer, such as a visitor’s geolocation, length of visit, pages navigated, etc. It relays the information to the application layer.
- Application layer:This comprises tools you add to your website for the web administrator’s use, such as Google Analytics and Facebook Pixel.
Why a data layer matters
Data layers ensure all tools in the application layer receive the same uniform data. It’s all about data consistency. Without the data layer, the application layer receives data straight from the presentation layer. This results in segmented data. Google Analytics and Facebook Pixel, for example, may receive information from different data sets.
Furthermore, data may also be inconsistent if modifications are made to the presentation layer. Data layers are insulated, and data within the layer is unaffected by alterations to the other layers.
Data layer examples
When do data layers come into play? Here are a couple of practical examples.
Let’s say you own a mortgage refinancing website. One page consists of a mortgage calculator that visitors can use to determine loan rates and eligibility based on their income.
In this instance, the data are the numbers visitors enter into the calculator. The information goes from the presentation layer to the data layer. The application layer, consisting of analytic tools, pulls the data from the data layer and yields performance metrics. It can also be set to trigger retargeting ads or special offers based on the specific data type.
Here’s another example: You can set your data layer to track click rates in your call to action. The data layer records this event and sends it to the analytic tools. Your data dashboard is updated, and you have new metrics to analyze. You can also set the system to automatically take a number of responsive actions, such as:
- Send exclusive email offers to the visitor
- Have related products appear in the visitor’s recommended list
- Direct the visitor to a QR code with product-specific details or even full whitepapers
Actions like punching numbers in a digital calculator or clicking a CTA link are events you can configure and assign custom dimensional values to. Set the data and application layer to initiate specific responses, from sending trial offers to special invites to loyalty programs.
How to create a data layer
To create a basic and single data layer (known as a flat data layer), there are three steps to follow:
- Build the data layer
- Create a channel to push the data from the presentation layer to the data layer
- Create a channel to pull the data from the data layer to the application layer
Let’s look at these steps in more detail.
1. Build the data layer
The most basic way to create a data layer from scratch is through JavaScript and to declare an empty array. You can do this using brackets ([ ]) or through a new array constructor method (new Array()). Both perform the same function. Most developers recommend brackets, simply because it’s easier to input.
Once you declare a data layer, the array object goes above the <head> tag. Here’s an example:
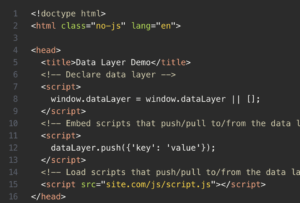
Photo credit: Makers Aid
An important note here is that the data layer declaration must come before any and all scripts that require a data push or pull from it. The script where you declare the data layer has to precede any third-party tools; this includes consent and tag managers. In other words, never reassign the data layer object. This action will delete all prior pushed data. This may disrupt the data as it moves to the application layer, creating inconsistencies.
Also, if you create multiple data layers, they need to be assigned different but uniform names. If you name the first one datalayer1, for instance, then follow the same formula by naming subsequent layers datalayer2, datalayer3, etc.
2. Create a data push
The next step is to create a data push to the data layer. The simplest method is to use JavaScript’s Array.push(). Furthermore, you can use the dataLayer.push() to push multiple data sets to the data layer. Be sure to distinguish nearby key and value pairs using a comma. Each data stream should also be surrounded by curly brackets. When implemented correctly, the data is incorporated into the array object end in the order you push them.
Here’s an example of creating a data push to the data layer:
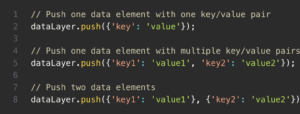
Photo credit: Makers Aid
3. Pull data
When pulling data from the data layer, you’ll most likely use a tag management system like Tealium or Google Tag Manager. From here, the data enters a downstream network where it’s absorbed by a suite of analytic and metric tools.
If you need to access data in the data layer, you can reference the array object’s name. Here’s an example of what this may look like for a data layer aptly named datalayer.
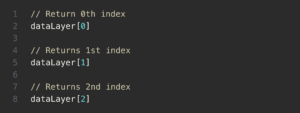
Photo credit: Makers Aid
Simplify data layer implementation with Lytics
Try Lytic’s Cloud Connect today. Get 24/7 access to your data no matter where you’re at. Create efficient multi-layer data layers, produce data layer extensions, and completely eliminate data silos. Whether your team operates in-house or remotely, we make data layer implementation an intuitive process. Try Lytics risk-free for 30 days by signing up for a trial today.